Distributor
Welcome To ONEILL ENGINEERING
((1))WATERPUMP REBUILDING
((2))FORD F1 MASTER CYLINDER CONVERSION
((4))FORD 3/4 HUBS
((6))1949 Ford E-Brake
((8))Phono Cartridge Rebuilding
((9))Ford Flathead Generator repair
((10))Flathead Distributor
((11))Lifting a Flathead
((12))Flathead starters
((13))F2 Brake parts
((14))'49 Ford pedal bushings
((15))02' Pontiac 5.7 PCV tube
((16))02' GM horns
((18))02' FIREBIRD window motor
((20))AO Smth Rebuild
((21))A.O.SMITH PART 2
((22))AO SMITH BEARING
((24))Plastic Panel Repair
((25))HomeBrew Growler
((33))GM Power Antenna
((34))Power Antenna in Camaro
((35))Fbody power seat switch
((36))2002 ws6 ls1 oil pan removal
((37))C5 hvac auto manual
((38))2018 GM wipers
((39))American Flyer wick replacement
((40))wood column replacement
((41))Fogger repair
((43))Lionel 1615 repair
((44))Ives 3254 reverse unit repair
((46))Craftsman Circular Saw 336.27963
((50))RCP 802 Tube Chart
((51))RCA 103 Speaker
((52))Atwater Kent Power Supply
((53))1928 ATWATER KENT MODEL 40
((54))TEST EQUIPMENT
((55))Bosch Model 48
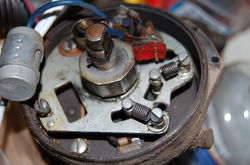
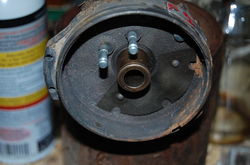
FORD 7RA DISTRIBUTOR REBUILD
Sample Photo 1
Grind down drive pin and remove with drift and hammer.
Sample Photo 2
Remove camshaft and lift out breaker point plate (removal of 2 wires to the base is required to remove the plate)
Sample Photo 3
With points plate out of the way remove the upper bearing, may need to tap on backside of bearing with a 1/4" extention thru the bottom of the distributor. There is a snap ring at the bottom of the bearing so be careful.
Sample Photo 4
Sometimes the bearing will come out with the camshaft. Remove in a loose vice, lightly sand and clean camshaft.
Sample Photo 5
Remove lower bearing with a 1/4" extension and socket from the top of the distributor.
Sample Photo 6
New bearing pressed in
Sample Photo 7

Brief Description
Sample Photo 8
Brief Description
Sample Photo 9
Brief Description
Sample Photo 10

Brief Description
Sample Photo 11

Brief Description
Sample Photo 12

Brief Description
Brief Description

